
Potluck vs Covered Dish? Monaimo Bars (Recipe Included)

Potluck or Covered Dish?
Like William, I grew-up in California and during my younger years my father was a Methodist minister so I attended about a bazillion potlucks as a kid. By the time I was sixteen I had stopped eating meat so potlucks lost a lot of their luster. Still, I come from a long line of potluck-goers so when I tell you that this recipe was the result of a Coffeyville, Kansas potluck, you will understand that this really is one of those down-home, much loved and shared recipes. It came into our family through my grandmother and, because it is so wonderful, has been shared out by my family many, many, many times.
However, before I go any further I have a question for you. Do you know what I mean when I say “potluck?” After William and I moved to Indiana, in 2000, I rapidly discovered that “potluck” is not a term that folks use here! In Rising Sun people attend “covered-dish suppers.” So here’s the question, are you a potluck or a covered-dish person? Inquiring minds want to know! (wink!)
Back to the cookies…

These cookies, called Monaimo Bars (we say, “mo-name-o.”), are the absolute, all-time cookie favorite in our family. The good news is that the layers make them just dressy enough to work as a Christmas cookie while still taking less time to prepare than almost any other kind of cookie out there.
Note: be sure to notice the ingredients for all three layers before doing your grocery shopping. (I would be embarrassed to tell you how many times I have made that mistake. Really…I would.)
Warning: this recipe contains a raw egg. Consuming raw eggs may increase your risk of foodborne illness. Very young children, the elderly and anyone with a compromised immune system are at greater risk.
Monaimo Bars
Rees family favorite, Monaimo Bars
Bottom Layer
• 1/2 c butter (I always use European-style butter. It’s higher in butterfat and the richness helps mellow the flavors in this strong layer.)
• 1/4 c sugar
• 5 Tbsp cocoa powder (I use dutch-process cocoa powder in this recipe because I don’t like the bitter bite from regular cocoa powder here. There is relatively little sugar in this layer so the cocoa has to stand on its own. BTW, did you know there is an actual chemical difference between regular cocoa powder, like Hershey’s, and dutch-process? I finally found out the actual scientific reason why I have, for so long, been using both but using them differently. It’s one of those things I stumbled across by taste but did not really understand. A couple of years ago I read a short blog post (https://sallysbakingaddiction.com/baking-basics-dutch-process-natural-cocoa-powder/) which did an excellent job at explaining why the two are not interchangeable. I recommend it to you if you are curious.)
• 1 egg (Okay, this recipe never gets baked so be sure to note the warning above. There are, however, things you can do to reduce risk. First, refrigerate the bars below 41° F (5°C) to prevent the growth of bacteria. Second, be sure the egg shell does not already have any fine cracks and then wash the egg so that any bacteria present on the shell is not transferred to the egg yolk or white. Third, wash your hands both before and after cracking the egg into the bowl.)
• 2 c graham crackers beaten down to very, Very, VERY fine crumbs (Let’s be honest, there is only one brand of graham cracker. Unless you are going to make your own it’s Honey Maid or nothing. Am I right? The problem is that getting the crackers fine enough takes some elbow grease. I put mine into two ziplock bags, a single bag is not sufficient, and then beat the daylights out of them with the flat side of a meat tenderizer. You can put them into a food processor but then you have to clean the food processor and that’s a lot of work. The really important thing is not to take the shortcut and purchase graham cracker crumbs. Pre-crumbed crackers end up tasting stale. So, gather up any frustrations you may have and vent it all on pounding the daylights out of the crackers. It’s both therapeutic and tasty. One packet of crackers makes just under one cup of fine crumbs so the regular size box of Honey Maid will do the job. )
• 1 tsp double strength vanilla (My note here is the same as last week, Penzeys Vanilla Double Strength is unbeatable. I only very rarely use any other vanilla because this is just too luscious to be missed.)
• 1 c chopped walnuts (These don’t have to be chopped too finely, but big chunks will cause the bars to fall apart. Go for something about the size of standard green peas.)
• 1 c shredded coconut (The only note I have here is that the dry coconut you’ve had in your cupboard for months is a no-go. Spring for a new bag because this layer needs the moisture from the fresher shreds.)
1. In a saucepan melt together the butter, sugar, and cocoa powder. Stir constantly until the sugar is smooth and the mixture looks shiny. Remove from the stove and pour into a large bowl which will not be damaged by heat, in other words, anything but plastic.
2. Whisk the egg in a separate, small bowl and set aside.
3. To the large bowl add the graham cracker crumbs, vanilla, chopped nuts and the coconut. Mix with a spatula and add in the egg about halfway through. Continue to mix until all the ingredients are well acquainted.
Pack into a 9” x 9” baking pan. When you first pour it in it will seem like way too much but pack it down really tightly. After you have it packed down, do it again until it is very, very tightly packed. Go all along the edge of the pan and scootch down any crumbs which have crept up the side of the pan so the edge is the same height as the rest of the layer. When it is well packed the layer will have just a bit of a shine.
4. Put the pan in the refrigerator while you prepare the middle layer.
_ _ _ _ _ _ _ _ _ _ _ _ _ _ _ _ _ _ _ _
Middle Layer
• 1/4 c butter, room temperature, whipped, in a medium bowl, with an electric mixer until it is soft and fluffy (Again, I always use European-style butter for this.)
• 3 Tbsp milk (Either 2% or whole works well.)
• 2 Tbsp French vanilla instant pudding (Absolutely do not use regular vanilla-flavored instant pudding. The French vanilla adds considerable depth to the flavor.)
• 2 c powdered sugar
1. After the butter is fluffy, beat the milk, vanilla and powdered sugar in with the butter. Add the powdered sugar a half cup at a time. This last instruction is only important because if you add it all at once you will cover everything in a four foot radius with a dramatic puff of sugar. Just trust me on this one. LOL!
2. Once everything is smoothly beaten pull the pan out of the refrigerator and spread the middle layer evenly across the bottom layer. A rubber spatula is your friend for this job. Again, keeping the edges clean and even with the rest of the layer will improve the overall sharpness of the appearance of the bars when you are finished.
3. Cover the pan with its lid, plastic wrap or foil and pop it back in the refrigerator. Now you can have a cup of tea, play a few tunes on your harp and just relax for a little while. In fact, if you want to you can even come back and finish the third layer the next day. The middle layer needs about an hour to really set but after that the timing is flexible.
_ _ _ _ _ _ _ _ _ _ _ _ _ _ _ _ _ _ _ _
Top Layer
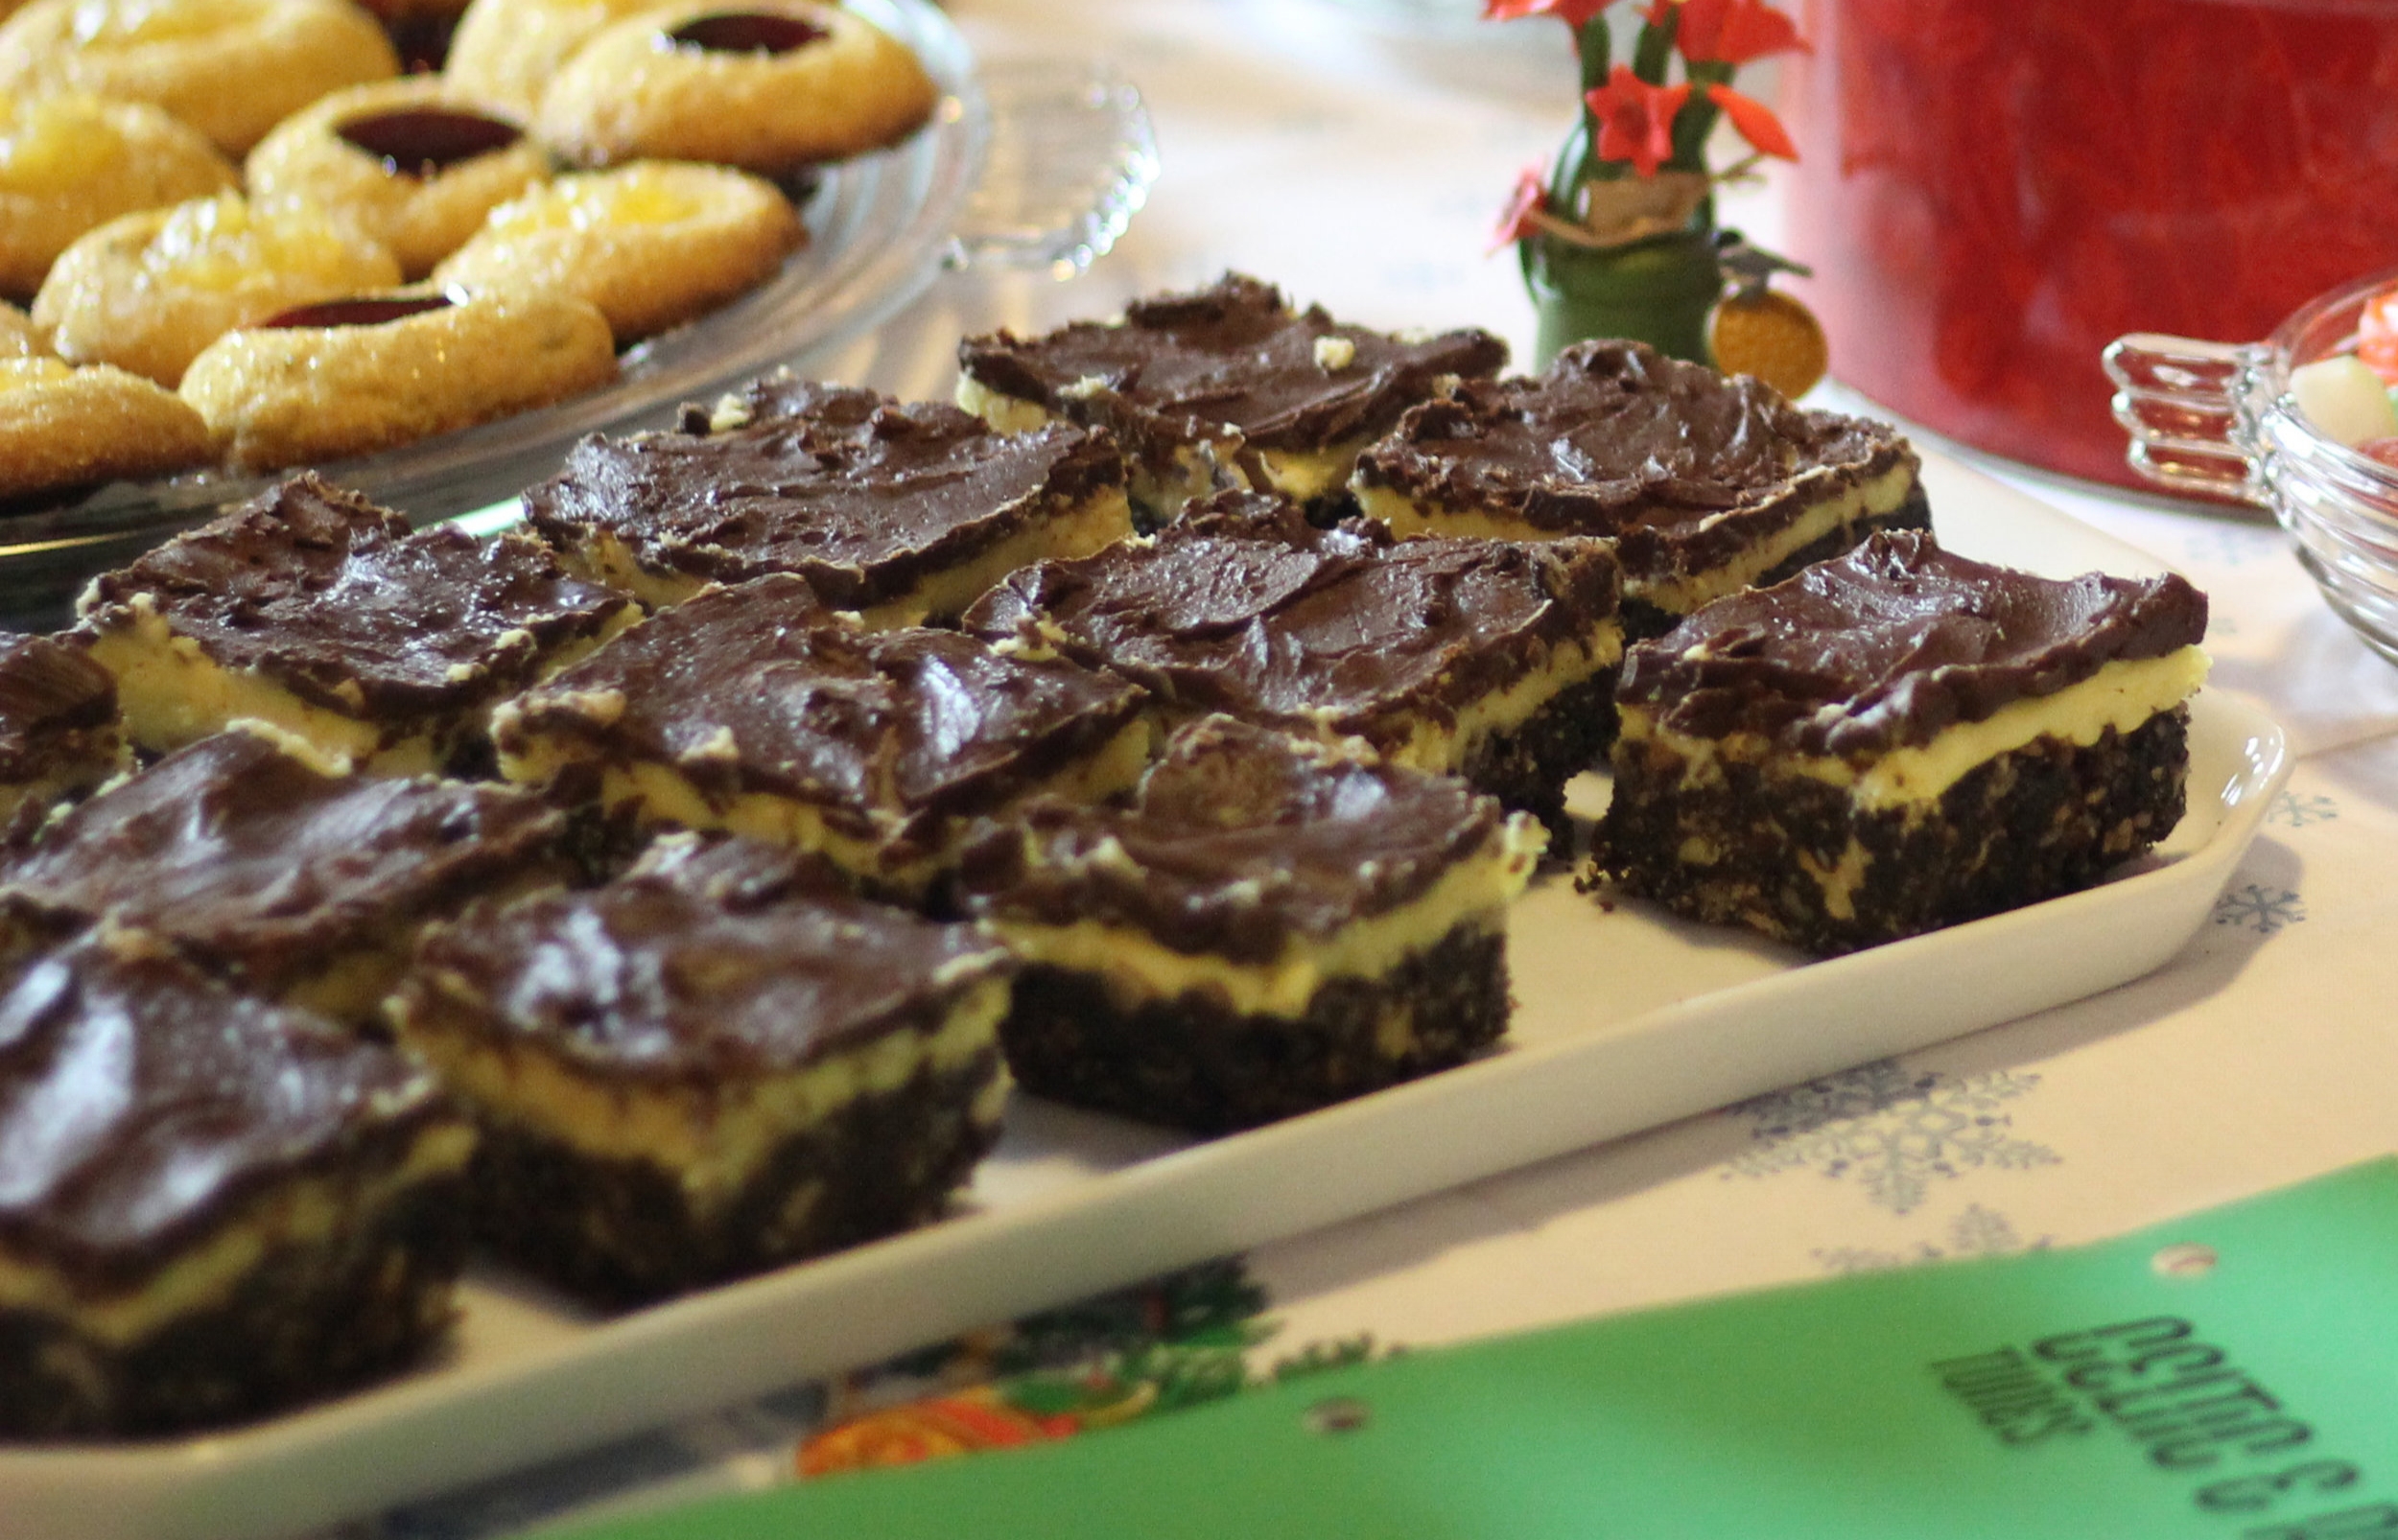
• 6 squares semi-sweet chocolate (The quality of the chocolate matters here. I didn’t quite grasp how much for a long time but now I generally only use Lindt or Ghirardelli and I get a much better result…though you would never know that to look at these photos. I’ll admit a secret here. The night before the photo shoot I was up late and only at the last minute realized that what I thought was semi-sweet chocolate in my cupboard was actually bittersweet. sigh! What I did have was 4 ounces of Ghirardelli and a lot of Hershey’s semi-sweet chocolate chips. Here’s the part where I got stupid. I used the Ghirardelli and then I added in 2 ounces of the Hershey’s. It wasn’t until I was way too far gone that I realized that the two chocolates have two very different melting points. In waiting long enough to melt the Hershey’s I ended-up “breaking” the Ghirardelli. This explains the choppy, flat look of the monaimo bars in the photos. They tasted fine but if I had thought to only use the Hershey’s they would have been much prettier. Oh well, live and learn! In case you are wondering, they still tasted just great.)
• 1 Tbsp + 1 1/2 tsp of butter (Usually, I just cut a bit under 2 TBSP off the butter bar. The measurement is not all that sensitive so if you have a little more or a little less it isn’t a crisis.

1. It’s easy to say “melt the butter in a small saucepan, add in the chocolate, melt and stir until they are both liquid and smooth,” but having just broken chocolate quite recently I am reminded to say that melting it in a double boiler sauce pan or creating your own temporary double boiler is much better and less likely to end in tears. Also, as previously noted, using one kind of chocolate…. Anyway, to create a temporary double boiler take a larger saucepan, fill it with water, heat to a medium boil and then hold the small saucepan up so that the bottom of it is in the boiling water but the little pan is not actually resting on the bottom of the big pan. Stir slowly but constantly until everything is melted together and looks glossy. If it starts to go dull you are heating it too fast, or for too long, and the chocolate is breaking.
2. Once the chocolate is melted you have to work very, very quickly. Take the pan with the other layers in it out of the refrigerator and pour the chocolate across it. I often try to pour in an “X” pattern so that there is less spreading to be done with a spatula because, as I mentioned, time is of the essence. Basically, you are battling to get the chocolate completely spread across the middle layer before it cools and sets. What you want is a thin, even layer of chocolate which completely covers the white middle layer.
3. Once you have the top layer on, cover the pan and pop it back in the refrigerator. The monaimo bars are finished once the top layer has had time to fully set and the middle layer, which will have become a bit soft while you were putting the top layer on, has had time to re-set. Anything after a half hour is plenty of time.
4. The bars will be very hard when they first come out of the refrigerator. It is best to allow them to warm-up just a bit prior to cutting them but these aren’t something you want to leave out for hours. Cut what you are planning to eat or serve and then pop the whole thing back into the refrigerator right away.
In our family we eat monaimo bars year-round but I am the most likely to make them for others during the Christmas season so I think of them as a Christmas cookie. The very best thing about them is how the flavors and textures all work together to make a rich, deeply satisfying treat. For me, I always have milk with them. Like having a bold, red zinfandel with Indian food, some pairings are just made for each other.
Next week I have a new twist on the classic Christmas cookie, angel thumbprints.

Sweet Christmas music with delicious monaimo bars. Yum!!!
“Yep, I’ve said it before and I’ll say it again. Life moves pretty fast. If you don’t stop and look around once and awhile, you could miss it.”